Някои потребители на Windows, които наскоро са надстроили до Windows 10, са подали оплаквания от лентата на задачите, напълно замръзваща няколко пъти. Когато това се случи, потребителите не могат да кликват върху който и да е елемент в лентата на задачите, т.е. менюто "Старт", иконите, известията. Също така преки пътища като Windows + R и Windows + X не работят.
Този проблем няма първопричина, тъй като е много разпространен в Windows. Някои обаче го свързват с Dropbox и няколко неизправни приложения. В тази статия ще разгледаме различните опции, чрез които можем да разрешим този проблем. Това включва стартиране на SFC сканиране, деинсталиране на някои приложения, стартиране на Explorer, наред с други.
Метод 1: Рестартиране на Windows Explorer
- Натиснете клавишите Ctrl + Shift + Esc, за да стартирате диспечера на задачите на Windows.
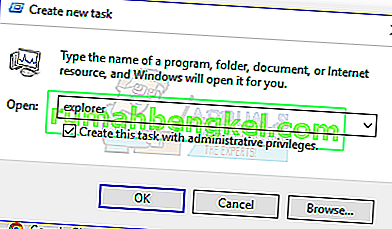
- В диспечера на задачите кликнете върху Файл > Изпълнение на нова задача . Въведете Explorer в отвореното поле и след това поставете отметка в квадратчето „Създаване на тази задача с администраторски права“ и щракнете върху OK .

Като алтернатива можете:
- Натиснете клавишите Ctrl + Shift + Esc, за да стартирате диспечера на задачите на Windows.
- Потърсете Explorer в раздела за процеси
- Щракнете с десния бутон върху записа на Explorer и изберете Рестартиране .
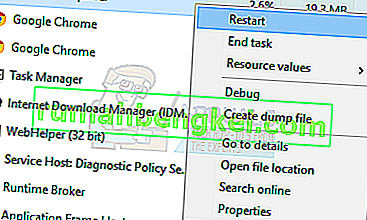
- Explorer ще се рестартира и лентата на задачите трябва да започне да работи отново

Метод 2: Стартиране на SFC сканиране
- Натиснете клавишите Ctrl + Shift + Esc, за да стартирате диспечера на задачите на Windows.
- В диспечера на задачите кликнете върху Старт> Изпълнение на нова задача . Въведете cmd в отвореното поле и след това поставете отметка в квадратчето „Създаване на тази задача с администраторски права“ и щракнете върху OK .
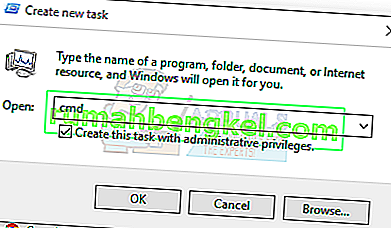
- В командния ред въведете следните команди и натиснете Enter след всяка команда:
sfc / scannow dism / Online / Cleanup-image / Restorehealth
Това ще стартира проверка на системния файл и ще поправи всички повредени системни файлове на вашия компютър.
- Рестартирайте компютъра си и проверете дали замръзналата лента на задачите е престанала.

Метод 3: Fix на Powershell
Използвайте тази команда Powershell, за да размразите замразената лента на задачите, като използвате тези стъпки.
- Ctrl + Shift + Esc, за да стартирате диспечера на задачите на Windows.
- Кликнете върху Още подробности , изберете раздела Услуги и се уверете, че MpsSvc (защитна стена на Windows) работи.
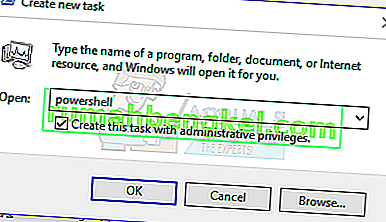
- Натиснете клавиша Windows + R, за да отворите подканата за изпълнение. Въведете PowerShell в подканата и натиснете Enter.
Ако подканата за изпълнение не успее да се отвори, натиснете клавишите Ctrl + Shift + Esc, за да стартирате диспечера на задачите на Windows, щракнете върху Старт> Стартиране на нова задача . Въведете powershell в отвореното поле и след това поставете отметка в квадратчето „Създаване на тази задача с администраторски права“ и щракнете върху OK .
- В прозореца Powershell поставете следната команда и натиснете Enter:
Get-AppXPackage -AllUsers | Foreach {Add-AppxPackage -DisableDevelopmentMode -Register “$ ($ _. InstallLocation) \ AppXManifest.xml”}. - След това лентата на задачите ви трябва да бъде напълно функционална.

Метод 4: Активирайте User Manager
Деактивиран мениджър на потребители може да доведе до замразена лента на задачите на Windows 10. Опитайте да активирате отново User Manager с тези стъпки.
- Натиснете клавиша Windows + R , напишете services.msc и щракнете върху OK . Това отваря конзолата за услуги.
- Потърсете User Manager и щракнете двукратно върху него.
- Задайте Тип стартиране на Автоматично и стартирайте услугата, ако е била спряна. Щракнете върху OK .
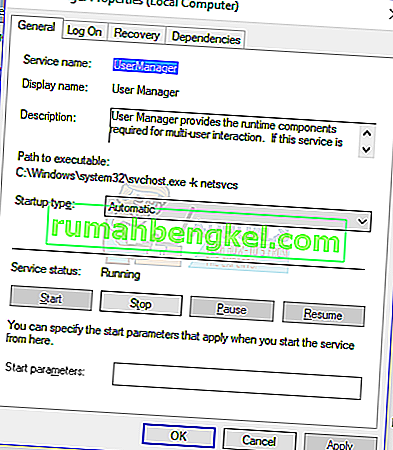
- Рестартирайте компютъра си и в този момент лентата на задачите трябва да функционира перфектно.

Метод 5: Деинсталирайте приложения
Някои потребители са идентифицирали някои потребители, което е причинило правилната работа на лентата на задачите. Тези приложения са Dropbox и Classic Shell . Ако подозирате, че има някакви приложения, причиняващи това, можете също да го премахнете.
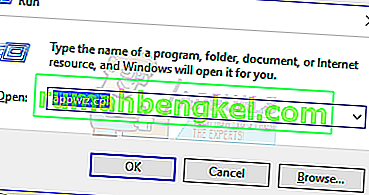
- Натиснете клавишите Windows + R, за да отворите подканата за изпълнение. Въведете appwiz. cpl и натиснете Enter .
- Намерете приложението в списъка с инсталирани приложения и след това щракнете двукратно върху него. Сега следвайте указанията, за да завършите деинсталацията.
- Рестартирайте компютъра си и след това проверете дали лентата на задачите функционира правилно сега.

Метод 6: Деактивиране на наскоро отворени елементи
Наскоро отворените елементи могат да забавят стартирането на списъка. Деактивирането им го прави по-бързо и предотвратява замръзване. Следвайте тези инструкции, за да деактивирате наскоро отворени елементи.
- Натиснете Win + I, за да отворите приложението Настройки.
- Придвижете се до Персонализация> Старт
- Плъзнете бутона за превключване до Показване на наскоро отворени елементи в Списъци за скок при Старт или лентата на задачите, за да го изключите.

- Лентата на задачите ви не трябва да замръзва при стартиране при следващото рестартиране

Метод 7: Нулиране на Windows 10 Services по подразбиране
Ако в този момент никой от горните методи не е работил, опитайте да стартирате този скрипт като администратор, като щракнете с десния бутон върху него и изберете Изпълни като администратор . Ако по някаква причина вашият WiFi вече не работи, следвайте стъпките тук (в Метод 3 - Стъпка 2: Вариант 2), за да разрешите проблема с WiFi.
Метод 8: Създайте нов потребителски акаунт
В някои ситуации грешката може да се задейства, ако настройките или конфигурациите на вашия потребителски акаунт не са били правилно зададени, както и ако има някаква повреда в тези данни за конфигурация. Следователно, като алтернатива, можете да опитате да създадете нов потребителски акаунт на вашата машина с Windows 10 и след това да импортирате данните от по-стария акаунт по-късно, ако той реши проблема. За да направите това:
- Натиснете „Windows“ + „I“, за да отворите настройките и щракнете върху опцията „Акаунти“ .
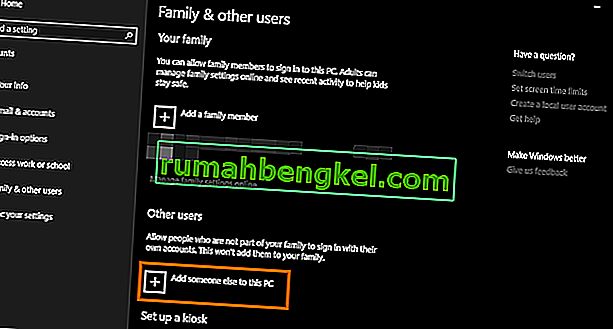
- В опцията за акаунти кликнете върху бутона „Семейство и други потребители“ от лявата страна.
- Изберете опцията „ Добавяне на някой друг към този компютър “ от менюто.
- Щракнете върху бутона „ Нямам информация за вход на този човек “ в следващия прозорец.
- Щракнете върху опцията „Добавяне на потребител без акаунт в Microsoft“ от новия прозорец, който се появява.
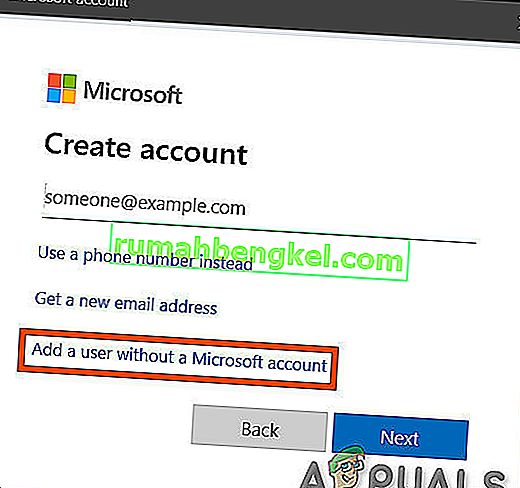
- Въведете потребителското име на потребителския акаунт и му задайте парола.
- Въведете въпросите за сигурност, отговорете на тях и след това кликнете върху опцията „Напред“ .
- След като създадете този акаунт, кликнете върху него и след това изберете опцията „Промяна на типа акаунт“ .
- Кликнете върху падащото меню „Тип акаунт“ и след това изберете опцията „Администратор“ .
- Запазете промените си и влезте в този акаунт.
- След като влезете в акаунта, стартирайте Steam и проверете дали играта работи.


If doing so fixes the issue on your computer, make sure to import the user account data from the previous account onto this new one and continue to use it normally.
Method 9: Diagnosing in Safe Mode
Sometimes, you might have installed some third-party applications on your computer that might be preventing you from being able to properly run the taskbar or its associated services. In addition to that, it is possible that even a Windows’ or Microsoft’s service is preventing the proper functioning of the computer. Therefore, in this step, we will be diagnosing this issue in the safe mode and then we will check to see if it can be fixed. For that:
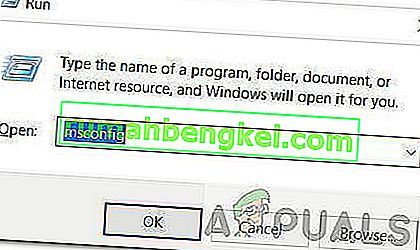
- Press “Windows”+ “R” to launch the run prompt.
- Type in “MSCONFIG” and press “Enter” to launch the Microsoft configuration window.
- In this window, click on the “Services” tab and uncheck the “Hide all Microsoft Services”
- After unchecking this option, click on the “Disable All” button and click on “Apply” to save your changes.
- After that, click on the “Startup” tab and then click on the “Open Task Manager” button to launch the task manager.
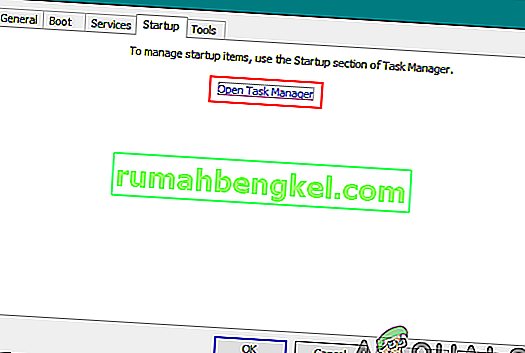
- In the Task Manager, click on each application that has been enabled and then click on the “Disable” button to prevent it from launching at startup.
- Restart your computer to now boot into the safe mode.
- In the safe mode, check to see if your taskbar freezes after some time or even at startup.
- If the taskbar doesn’t freeze inside this mode, it means that a third-party application or service was causing this issue.
- Start enabling the applications one by one and check to see which one makes the issue come back.
- If all the applications are fine, start enabling the services one by one and check to see which one makes the issue come back.
- Keep the problematic service/application disabled or try to reinstall/update it.


Method 10: Performing System Restore
Some users found that performing a simple restore to an earlier working date fixed their issue but you will have to carefully select the restore point to which you will be restoring. It is recommended that you manually go through this process instead of using the automatic restore. In order to perform this step, follow the guide below.
- Press “Windows” + “R” to open the Run prompt.
- Type in “rstrui” and press “Enter” to open the restore management window.
- Click on “Next” and check the “Show more Restore Points” option.
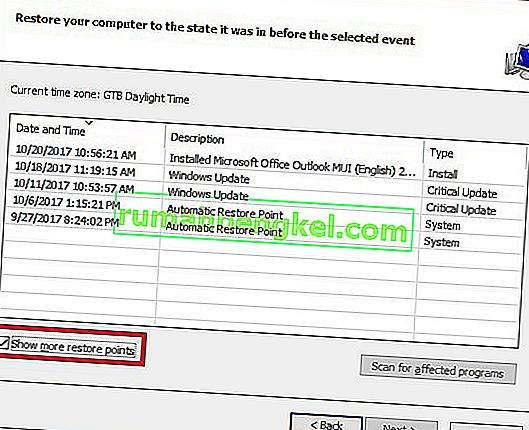
- Select a restore point in the list that is older than the date on which this issue started occurring on your computer.
- Click on “Next” again and follow the on-screen instructions to restore everything back to the date which you selected from the restore window.
- Check to see if doing so fixes the issue with the frozen taskbar.


Method 11: Toggle System Icons
It is possible in some cases that the system icon setting might be glitched on your computer due to which this issue is being triggered. Therefore, in this step, we will be toggling these icons and then we will check to see if doing so fixes the issue. For that:
- Press “Windows” + “I” to open the settings and click on the “Personalization” option.
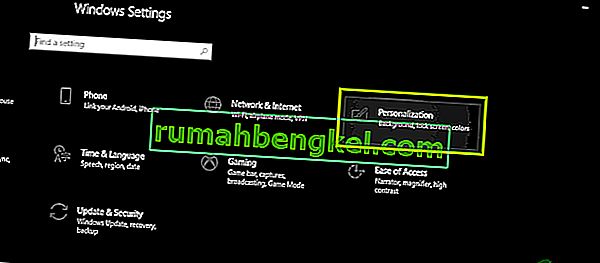
- From the left side, click on the “Taskbar” button.
- Under the “Notifications Area” heading, click on the “Turn System Icons on or off” button.
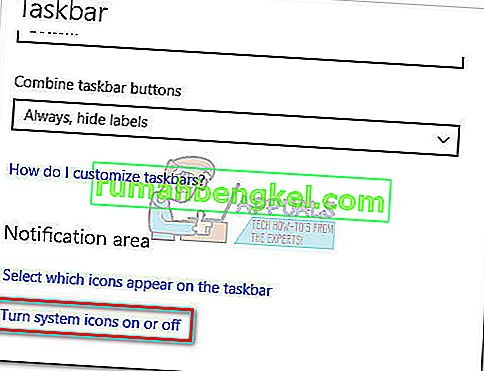
- Toggle all of the icons in the next window one by one by turning them off for a couple of seconds and then turning them back on.
- After completing this process, navigate back to the desktop by closing out of this window.
- Check to see if doing so has fixed the issue.


Method 12: Run Windows Maintenance Troubleshooter
It is possible that there might be some leftover files on your computer due to which there is a shortage of system paging memory or if there are leftover shortcuts from certain applications, that can also prevent the taskbar from functioning correctly. Therefore, in this step, we will be running the Windows Maintenance Troubleshooter and then check to see if doing so fixes this issue. For that:
- Press “Windows’ + “R” to open the Run prompt.
- Type in “Control Panel” and press “Enter” to launch the classical control panel interface.

- Click on the “View By:” option from the top and select the “Large Icons” option from the menu.
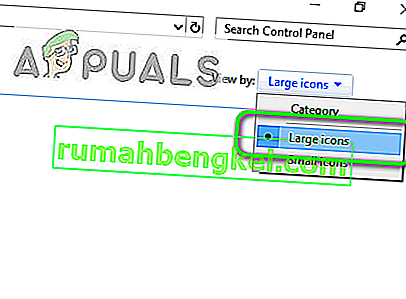
- In the next window, click on the “Troubleshooting” option and then click on the “Run Maintenance Tasks” button.
- In the window that pops up, click on the Next button, and provide administrative privileges to successfully run this task.
- Wait for the Maintenance to be completed and check to see if doing so has fixed the issue with the frozen taskbar.


Method 13: Use DDU to Perform a Clean Install
In some cases, it is possible that the Graphics Card installed on the system might have a faulty driver installed due to which this issue is being triggered. Therefore, in this step, we will be performing a Clean install of the Graphics Driver by uninstalling the Driver using DDU and then we will check to see if doing so has fixed the issue with the Taskbar. For that:
- Make sure to back up any important data before performing this step in case something goes unexpected.
- Download the DDU software from this website.
- After downloading the software, extract the zip file and open the folder where it has been extracted.
- Run the “.exe” file inside the folder and it will automatically further extract inside the same folder.
- Open the newly extracted folder and click on the “Display Driver Uninstaller.exe”.
- Click on the “Select Device Type” dropdown and select “GPU”.
- In the other dropdown, select the manufacturer of your GPU and then click on the “Clean and do not Restart” option.
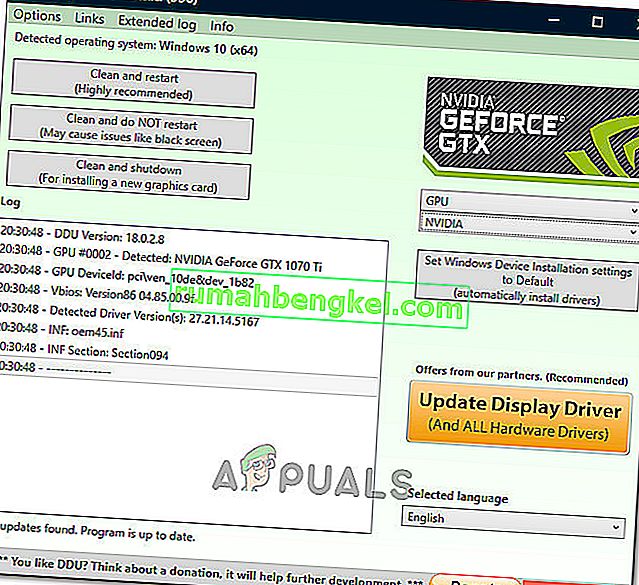
- This will uninstall the device driver for your GPU and it should automatically shift to the Microsoft Basic Visual Adapter.
- After uninstalling this software, download the GPU driver from your manufacturer’s website by specifying your exact make and model.
- Install this software on your computer and then check to see if doing so fixes the taskbar freezing issue on your computer.

Method 14: Stopping Windows Service
In some situations, it is possible that a certain Windows service might need to be stopped from the task manager. Therefore, in this step, we will be preventing it from running in the background as it has likely hanged due to which the taskbar is being frozen. In order to stop this service:
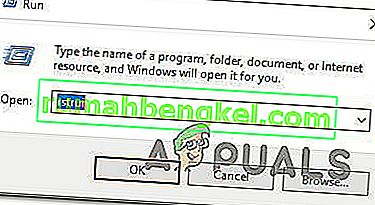
- Press “Windows’ + “R” to open the Run prompt.
- Type in “taskmgr” and press “Enter” to open the Task Manager.
- Click on the “Processes” tab and from the list, click on the “Service Host: DCOM Server Process Launcher” service.
- Click on the “End Task” button and close out of the task manager.
- After closing out of the task manager, check to see if doing so has fixed the frozen taskbar situation.

Method 15: Stop Microsoft Edge and Remove it from Taskbar
In some situations, the default browser that comes installed with Microsoft Windows might just be the culprit behind this whole issue. If you are using another browser as your go-to default browser, you might see that using the Microsoft Edge browser causes issues with the taskbar. Therefore, in this step, we will be stopping Microsoft Edge from the Task Manager and then we will remove it from the taskbar. For that:
- Press “Windows’ + “R” to lauch the Run prompt.
- Type in “taskmgr” and press “Enter” to open the Task Manager.
- Click on the “Processes” tab and from the list, click on the “Microsoft Edge” browser.
- Click on the “End Task” button and close the task manager.
- If the Taskbar is still frozen, restart your computer and repeat this process.
- After doing so, right-click on the Microsoft Edge icon in the taskbar.
- Select the “Unpin from Taskbar” option to remove Microsoft Edge from your taskbar.
- Check to see if doing so fixes the issue.

Method 16: Remove Outdated References
It is possible that your Registry might be plagued with outdated references to an old operating system that you might’ve upgraded from. Even if you have removed the Windows.old folder from your computer, some driver and registry files might still be associated with the “Windows.old” folder which practically doesn’t exist on your computer and this misconfiguration might prevent your computer from working properly. Therefore, in this step, we will be removing it from the registry editor. For that:
- Press “Windows’ + “R’ to open the Run prompt.
- Type in “regedit” and press “Enter” to open the registry editor.

- Press “Ctrl” + “F” to open the finder and type in the “c:\windows.old” line and press “Enter” to find any registry related entries.
- Delete or remove any such entries that refer to this and run an SFC scan to check for any missing files.
- Make sure to install any missing drivers using Driver Easy and then check to see if the Frozen Taskbar issue has been fixed.

Method 17: Rollback Updates
In some situations, Windows might’ve acquired some updates that are preventing your computer from functioning properly and due to this, the taskbar feature has been broken. Therefore, in this step, we will be rolling back some recently installed updates and then we will check to see if doing so fixes the frozen taskbar issue. In order to do that:
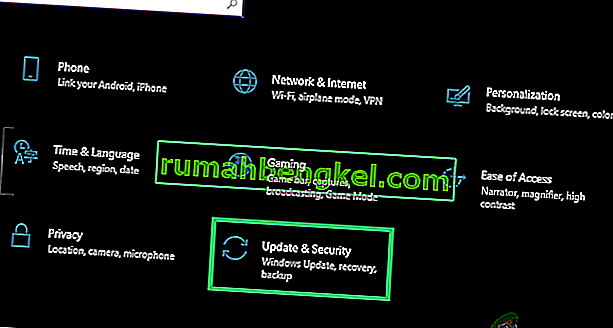
- Press “Windows’ + “I” buttons on your keyboard to open the Windows settings.
- In the Windows Settings, click on the “Update and Security” button and from the left pane, select “Windows Update”.
- On the next screen, select the “Update History” button and it should lead to a new window.
- In the new window, there should be an “Uninstall Updates” button and by clicking on it, a prompt should open that should enable you to be able to uninstall an update.

- Follow the on-screen instructions to be able to fully remove the update and check to see if the issue persists after doing so.


Method 18: Signing out of Account
It is possible that the Windows Taskbar is getting frozen due to a glitch during the account login. Therefore, we can test this out by simply signing out of our account and then signing back in to ensure that the account is logged in properly and that it is properly registered with the Microsoft Servers. In order to do so:
- Press “Ctrl” + “Alt” + “Del” buttons on your keyboard to open up the account options.
- Click on the “Sign out” option from the screen to log out of your account.

- Wait for Windows to completely sign you out of your account and confirm any prompts on your screen to complete the sign-out process.
- Select your account and sign back into your account from the next screen by entering your login details.
- Check to see if doing so has fixed the frozen taskbar issue on your account.

Method 19: Creating Batch File
Most people found that restarting the Windows Explorer fixed their issue but for some of them, it kept coming back after a while. Therefore, in this step, we figured out a way for the people that can solve it by restarting but all they will have to do is click on a batch file present on their desktops. For that:
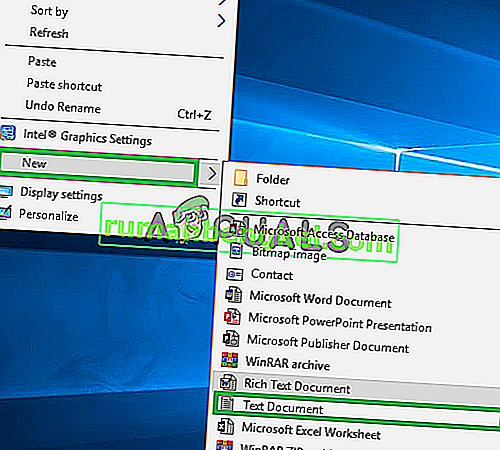
- Right-click anywhere on your desktop and select the “New>” option.
- Click on the “Text Document” option and a new text document will be created on your desktop.
- Open this text document and paste the following lines inside of the text document.
taskkill /f /IM explorer.exe start explorer.exe exit
- Click on the “File” option at the top left of the window and select the “Save As” option.
- Enter the “TaskMRestart.bat” as the file name and select “All Files” from the “File Type” dropdown.
- Save this file on your desktop and exit out of the document.
- Now, double-clicking on this newly saved file should automatically restart File Explorer which should fix the Frozen taskbar issue within a second.
- You can just click on the file whenever the taskbar freezes and it should fix itself.

Method 20: Perform an Update
The frozen taskbar issue was a very famous topic on most Microsoft forums and apparently a lot of Microsoft officials took note of it. Therefore, it is possible that this issue might’ve been fixed for some people in recent updates released by Microsoft. Therefore, in this step, we will be checking for any available updates from Microsoft and installing them on our devices. For that:
- Press “Windows” + “I” to open the settings.
- In the settings, click on the “Update and Security” option and then select the “WindowsUpdate” button from the left side.
- In the Windows Update, click on the “Check for Updates” button and a prompt will be registered that will automatically check for any newly available updates.

- Install these updates on your computer by following the on-screen instructions and restart your computer.
- Check to see if installing these updates fixes the issue on your computer.

Method 21: Unpinning Items from Start Menu
Some people like to pin important items to the start menu for ease of access and increased productivity. However, as it stands, some Windows users have been facing the frozen taskbar issue due to these pinned items. Therefore, in this step, we will be unpinning some items from the start menu and the taskbar and then we will check to see if doing so fixes the frozen taskbar bug.
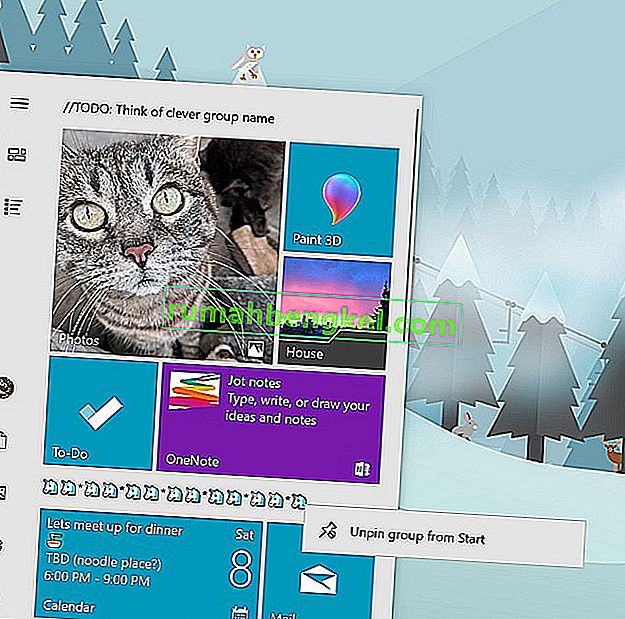
- Press the “Windows” button on your keyboard to launch the start menu.
- Inside the start menu, right-click on a tile on the right side of the start menu.
- Select the “Unpin from Start Menu” button to remove the item from the Start menu tiles.
- After removing some items, check to see if the bug is fixed.
- Try removing all the items that can be removed if the bug comes back and check again.
- For a more accurate removal, try removing all the programs from the taskbar and the Start menu that try to connect to the internet, for example, Microsoft Edge, Cortana, News, etc.

Method 22: Disable Items from Bios
It is possible in some cases that the computer’s Bios has been improperly configured due to which the Windows Taskbar is getting frozen time and time again. Therefore, in this step, we will first be booting inside the Bios from which we will disable an option that should get rid of this problem if it was based around the Bios. In order to do so:
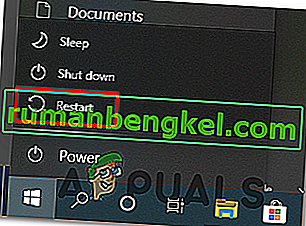
- Press the “Windows” button on your keyboard and click on the “Power Button” icon.
- Select the “Restart” option from the list and wait for your computer to prompt a restart.
- When the computer shuts down and starts booting up, start pressing the “Del”, “F12” or “F11” key depending upon your motherboard to boot inside the computer’s bios.
- From the bios, navigate through different settings until you find the “iGPU Multi-Monitor” feature.
- Disable this feature inside the Bios and boot back into Windows.
- Check to see if disabling this feature worked and fixed the frozen taskbar error.